Looking for a sustainable way to manage your property’s water supply? Efficient water collection methods can be a game-changer. These techniques capture water from roofs and other surfaces, reducing reliance on traditional sources. This approach is not only eco-friendly but also cost-effective in the long run.
Federally endorsed technologies, like those documented by the Federal Energy Management Program, validate the benefits of these methods. They can be used for various applications, including irrigation, cooling towers, and even domestic uses after proper treatment. Proper design and component selection are crucial to maximize efficiency.
By offsetting freshwater use, these methods play a significant role in improving water quality. They also help in reducing water bills and demand on existing supplies. Stay tuned for a detailed guide on how to implement these systems effectively.
Getting Started with Rainwater Harvesting
Starting a project to collect water from your roof can be simple and rewarding. By understanding the basics, you can create a system that meets your needs and supports sustainability. Let’s explore the key steps to begin your journey.
The roof is the primary catchment area for water collection. Its material and quality play a crucial role in ensuring clean and efficient water flow. Metal or tile roofs are often preferred due to their durability and minimal contamination risks.
Choosing the right tank size is essential. It should match your local rainfall patterns and water supply needs. For example, a 1,000-square-foot roof can collect over 1,100 gallons of water per month in areas with average rainfall.

Assessing your water supply requirements is the next step. Consider how you plan to use the collected water, whether for irrigation, household tasks, or other purposes. This will help determine the scale of your system.
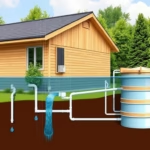
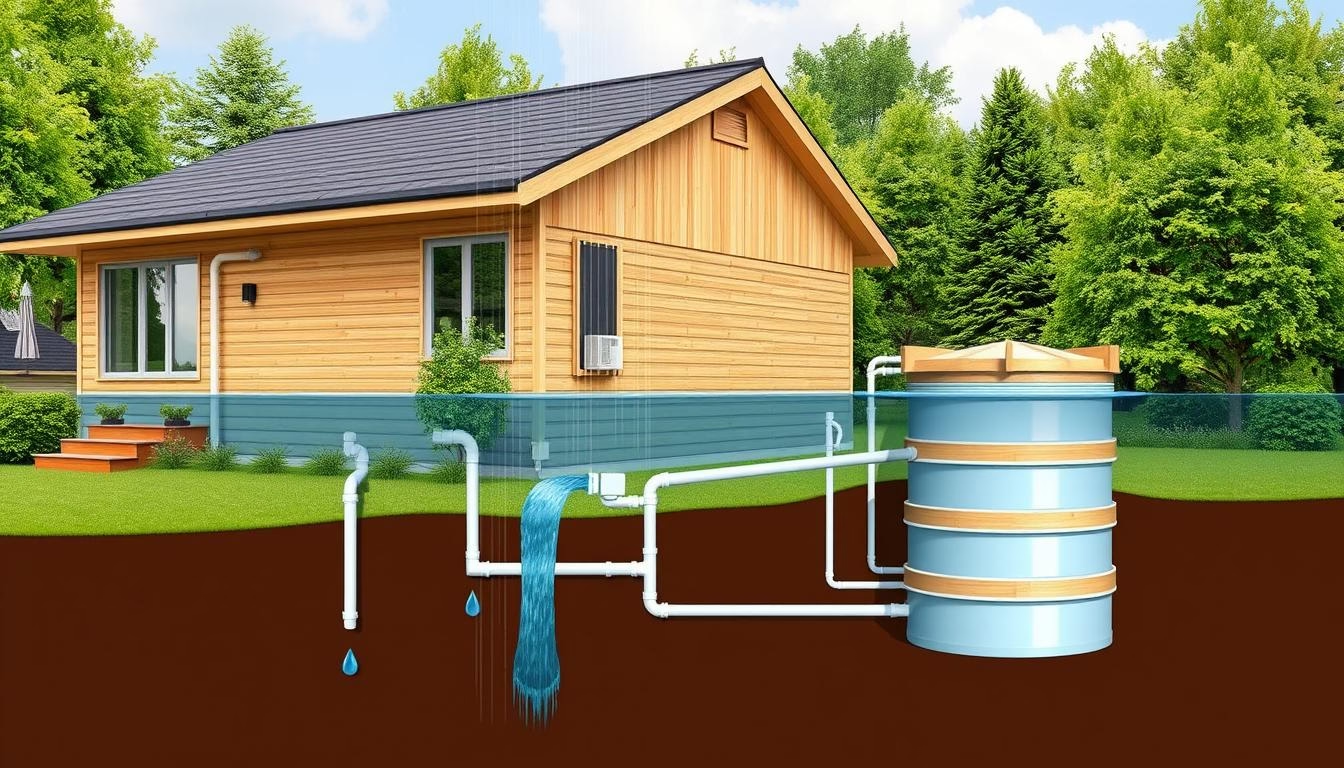
Gutters and downspouts are vital components of the collection process. They direct water from the roof to the storage tank. Proper installation ensures minimal loss and maximum efficiency.
Design tips include positioning the tank close to the downspout and using filters to remove debris. These steps help optimize the use of available water and extend the system’s lifespan.
=> How to make a cheap water collection system
Here’s a quick overview of the basic components needed for a simple setup:
| Component | Purpose |
|---|---|
| Roof | Primary catchment area |
| Gutters | Channel water to downspouts |
| Downspouts | Direct water to the tank |
| Storage Tank | Hold collected water |
| Filter | Remove debris and contaminants |
With these fundamentals in place, you’re ready to move on to assessing your property and rainfall patterns. This will help tailor the system to your specific needs and ensure its effectiveness.
Assessing Your Property and Rainfall Patterns
Understanding your property’s potential for water collection is the first step toward sustainability. By evaluating key factors, you can design a system that meets your needs and maximizes efficiency.
Start by measuring your roof’s surface area. This is the primary catchment area for water. Metal or tile roofs are ideal due to their durability and minimal contamination risks. The size of your roof directly impacts the amount of water you can collect.

Next, analyze local rainfall patterns. Use tools like the Rainwater Harvesting Calculator to estimate the monthly water supply. For example, a 1,000-square-foot roof can collect over 1,100 gallons of water per month in areas with average rainfall.
Match your water supply with your property’s demand. Consider uses like toilet flushing, which accounts for about 30% of indoor water usage. This ensures your system is tailored to your specific needs.
Related: Homesteading on a Budget: Create The Self Sufficient Backyard
Here’s a quick guide to assessing your property:
| Factor | Details |
|---|---|
| Roof Surface | Measure area and material efficiency |
| Rainfall Data | Use local data to estimate water amount |
| Water Demand | Match supply with household needs |
| System Size | Adjust based on collection area and usage |
Periodic reassessments are crucial. They ensure your system adapts to changing water demands and remains efficient over time. With these steps, you’ll create a system that’s both practical and sustainable.
How to Install Rainwater Harvesting Systems
Proper installation ensures your water collection system runs smoothly and efficiently. Start by setting up gutters to channel water from your roof. Use quality materials like aluminum or stainless steel to prevent contamination and ensure durability.
Position the storage tank close to the downspout for optimal water flow. Choose FDA-approved materials for the tank to minimize microbial growth. This step is crucial for maintaining water quality and safety.

Integrate a pump to maintain consistent water flow and prevent backflow. Proper pump installation ensures the system operates efficiently, especially during dry spells. Control systems can further enhance performance and reduce maintenance needs.
Measure your roof area and rainfall patterns to determine the right tank size. For example, one inch of rain on a 1,000-square-foot roof can yield over 600 gallons of water. This data helps tailor the system to your specific needs.
To manage runoff and debris, install filters and first flush diverters. These components prevent contaminants from entering the tank and protect water quality. Regular gutter cleaning, at least twice a year, ensures clean water delivery.
Finally, secure the tank on a level surface and raise it a few inches for easy access. This setup prevents tipping and ensures proper drainage. With these steps, your system will be efficient, durable, and eco-friendly.
=> Drought-Proof Your Home: 40 Gallons of Water from Air! (Video)
System Components and Design Recommendations
Designing an effective water collection setup requires careful planning and the right components. A well-designed system ensures maximum efficiency and longevity. Let’s explore the essential parts and best practices for creating a reliable setup.
The first step is selecting the right storage tank. Food-grade materials like polyethylene are ideal for maintaining water quality. These tanks come in various sizes, so choose one that matches your local rainfall patterns and water needs.

Rain barrels are another key component. They are perfect for smaller setups and can be connected to downspouts for easy collection. Ensure the barrel has a secure lid to prevent debris and pests from entering.
First flush diverters and inlet filters play a crucial role in maintaining water quality. They remove contaminants from the initial flow, ensuring cleaner water enters the storage tank. Regular cleaning of these components is essential for optimal performance.
Here’s a quick overview of the critical components:
| Component | Purpose |
|---|---|
| Storage Tank | Holds collected water |
| Rain Barrel | Small-scale collection |
| First Flush Diverter | Removes initial contaminants |
| Inlet Filter | Prevents debris entry |
When designing your system, consider state and local regulations. These guidelines ensure your setup is compliant and safe. Professional advice can also help optimize your design for both non-potable and potable uses.
Integrated system design is key to maximizing storage and longevity. Proper placement of components and regular maintenance will keep your system running smoothly for years to come.
Recommended: How To Transform A Typical Money-Draining House Into A Tiny Profitable Off-The-Grid Homestead (Video)
Sizing and Optimizing Your Storage Tank
Choosing the right storage tank size is essential for maximizing water collection efficiency. Start by calculating the ideal size based on your roof’s dimensions and local rainfall data. For example, a 1,000-square-foot roof can collect over 600 gallons of water from just one inch of rain.
Use this formula to estimate your water supply: Roof Area (sq. ft.) × Rainfall (inches) × 0.623 = Gallons Collected. This calculation helps match your tank size to your property’s specific needs. Over-sizing can be beneficial in areas with highly variable rainfall, ensuring you have enough water during dry spells.
Selecting the right barrel or storage tank is equally important. Polyethylene tanks are cost-effective and durable, making them a popular choice. Ensure the tank is FDA-approved to maintain water quality and safety. Proper placement, such as raising the tank a few inches, also improves accessibility and drainage.
Optimization strategies include integrating advanced filters and monitoring devices. First flush diverters and inlet filters remove debris and contaminants, preserving water quality. Regular maintenance, like cleaning gutters twice a year, ensures consistent performance.
Here’s a quick guide to key considerations:
| Factor | Details |
|---|---|
| Roof Area | Measure to estimate water collection potential |
| Rainfall Data | Use local averages to determine supply |
| Tank Material | Choose FDA-approved options for safety |
| Filter System | Install to maintain water quality |
By aligning your system design with accurate calculations and local regulations, you can create an efficient and sustainable setup. Proper sizing and optimization ensure you maximize water availability while minimizing costs.
Operation, Maintenance, and Water Quality Improvement
Ensuring your water collection setup operates efficiently requires consistent care and attention. A well-maintained system not only performs better but also extends its lifespan. Regular upkeep of components like gutters, filters, and pumps is essential for optimal performance.
Monitoring the water level in your storage tank is crucial. It helps prevent overflows and ensures the system meets your property’s demand. Use a simple gauge or sensor to track the level and adjust usage accordingly.
Periodic inspections are key to identifying potential issues early. Check gutters for debris, clean filters, and inspect pipes for leaks. These steps minimize contamination and maintain water quality for various applications.
Here’s a recommended maintenance schedule for key components:
| Component | Maintenance Frequency | Action |
|---|---|---|
| Gutters | Every 6 months | Remove debris and check for clogs |
| Filters | Monthly to Quarterly | Clean or replace based on type |
| Pipes | Annually | Inspect for leaks and repair |
| Storage Tank | Yearly | Clean and check for sediment |
Water quality testing is vital, especially for potable uses. Test for contaminants like bacteria and sediment regularly. Simple methods like chlorination or boiling can improve safety.
Proper maintenance of pipes and connections prevents leaks and ensures efficient water flow. Insulate exposed pipes in winter to avoid damage from freezing temperatures.
By following these guidelines, you can keep your system running smoothly and ensure clean, reliable water for all your needs. Regular care not only improves performance but also supports long-term sustainability.
Conclusion
Adopting sustainable water practices can transform how you manage resources. By focusing on your catchment area and using proper components, you can reduce reliance on municipal supplies. This approach minimizes debris and chemical runoff, protecting local waterways.
Regular maintenance ensures your system operates efficiently. Cleaning filters and inspecting pipes prevent contamination and extend the system’s lifespan. These steps also improve water quality, making it safer for various uses.
Consider local city guidelines when installing your setup. Compliance ensures safety and maximizes benefits. Professional consultation can help tailor the system to your property’s needs.
By reducing water bills and supporting environmental health, these practices offer long-term advantages. Start your journey toward sustainability today and make a positive impact on your community.