When you’re miles from the nearest hospital or emergency room, knowing how to properly close a serious wound could mean the difference between life and death. Our ancestors understood this reality intimately – they lived in a world where self-reliance wasn’t just preferred, it was essential for survival. Today, as modern systems become increasingly fragile and unpredictable, these time-tested techniques are becoming relevant once again.
The improvised butterfly closure technique has been saving lives for centuries, from Civil War battlefields to remote homesteads where doctors were days away. This method can hold wound edges together almost as effectively as professional sutures, giving you the crucial time needed for healing to begin or for proper medical care to become available.
Understanding Butterfly Closures: The Science Behind the Technique
Butterfly closures, also known as butterfly stitches or Steri-Strips, work on a simple but effective principle: they pull the edges of a wound together and hold them in proper alignment while the body’s natural healing process takes over. The distinctive “butterfly” shape – wide ends with a narrow middle – isn’t just aesthetic; it’s engineered for maximum effectiveness.
The wide ends provide a broad surface area for adhesion to healthy skin around the wound, while the narrow middle section crosses the wound itself without interfering with the healing process. This design distributes tension evenly and reduces the risk of the closure pulling away from the skin under stress.
When professionally manufactured butterfly closures aren’t available, you can create equally effective versions using common household materials. The key lies in understanding the proper technique and having the right materials on hand.
Essential Materials: What You Need for Emergency Wound Closure

Primary Materials:
- Medical tape (preferred): Paper tape, medical adhesive tape, or cloth tape
- Duct tape (emergency backup): While not ideal due to its aggressive adhesive, it can be life-saving when nothing else is available
- Clean scissors or knife: For cutting tape strips to proper size
Adhesion Enhancers:
- Tincture of benzoin: A professional-grade skin adhesive that dramatically improves tape adherence
- Honey: Nature’s antiseptic with natural adhesive properties
- Rubbing alcohol: For cleaning the wound area (but never directly on the wound)
Additional Supplies:
- Clean cloth or gauze for wound cleaning
- Sterile water or saline solution
- Antiseptic solution (iodine or hydrogen peroxide)
The beauty of this technique lies in its simplicity – most of these items are already present in well-prepared households. If you’re following the principles outlined in building a comprehensive home first aid kit, you’ll have everything needed to perform this life-saving procedure.
Creating and Applying Butterfly Closures
Step 1: Assess and Clean the Wound
Before applying any closure, carefully evaluate the wound. Butterfly closures work best on:
- Clean cuts without jagged edges
- Wounds less than 2 inches long
- Cuts that aren’t too deep (you shouldn’t see fat, muscle, or bone)
- Fresh wounds (less than 6-8 hours old)
Clean around the wound thoroughly with antiseptic, working outward from the wound edges. Never pour antiseptic directly into the wound – this can damage tissue and slow healing.
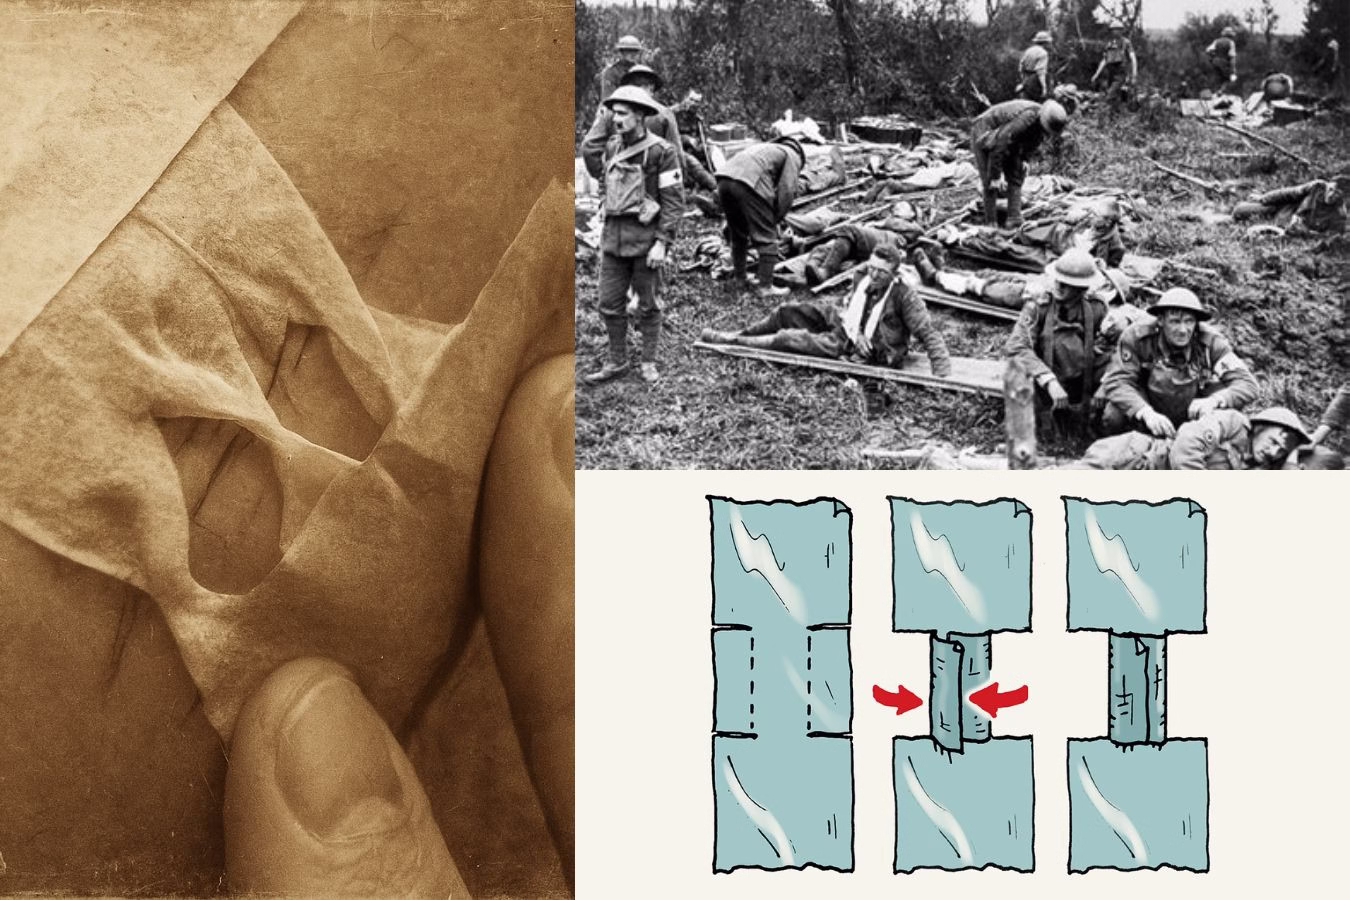
Step 2: Create Your Butterfly Closures
Cut tape strips approximately 3-4 inches long. Using clean scissors, cut a narrow section in the middle of each strip, leaving about 1/4 inch of tape in the center. The result should look like an hourglass or bowtie shape. You’ll typically need 3-6 closures depending on the wound length.
Pro tip: If using duct tape, you can reduce its aggressiveness by first applying it to clean clothing fabric and removing it once – this removes some of the adhesive while leaving enough for effective wound closure.
Step 3: Prepare the Skin
Apply tincture of benzoin or a thin layer of honey to the skin around the wound (not in the wound itself). This creates a tacky surface that dramatically improves adhesion. Allow benzoin to dry for 30-60 seconds until it becomes slightly sticky.
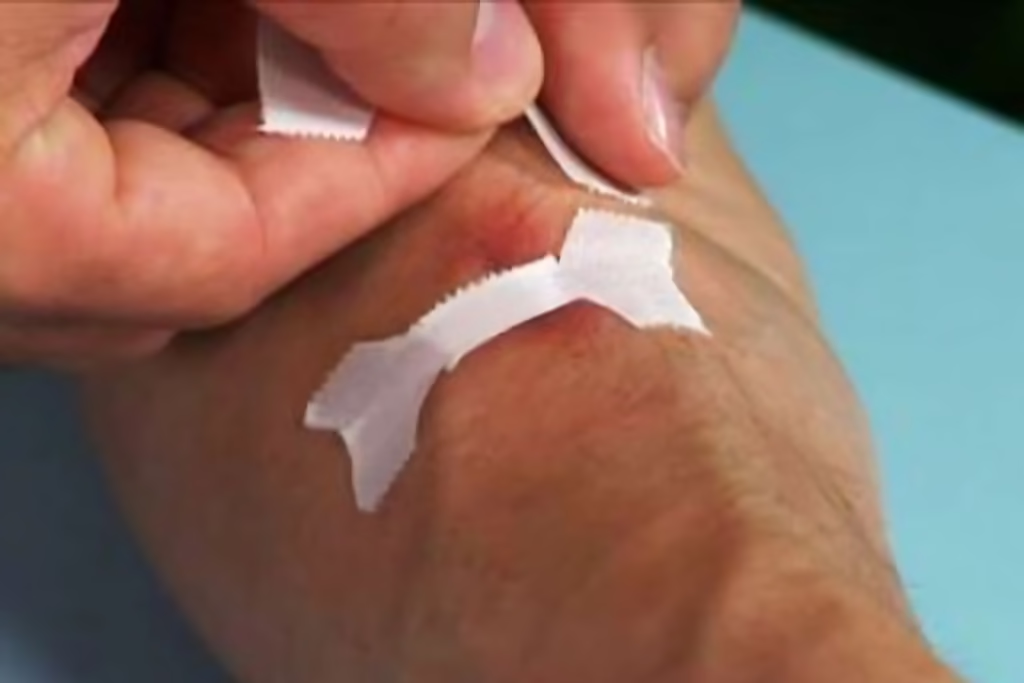
Step 4: Apply the Closures
Starting from one end of the wound, place the first butterfly closure perpendicular to the cut. Press one wide end firmly to the skin on one side of the wound, then gently pull the wound edges together and secure the other end. The closure should bridge the wound without creating excessive tension.
Continue placing additional closures along the wound, spacing them about 1/4 inch apart. Work systematically from one end to the other, ensuring each closure properly aligns the wound edges.
Step 5: Protect and Monitor
Cover the closed wound with a sterile gauze pad and secure with medical tape. Change the dressing daily and monitor for signs of infection: increased redness, warmth, swelling, pus, or red streaking extending from the wound.
Historical Context: Battlefield Medicine and Frontier Wisdom
This technique isn’t a modern innovation – it’s rooted in centuries of practical medicine born from necessity. During the American Civil War, field medics developed improvised wound closure methods using whatever materials were available: strips of cloth, paper, and even tree bark treated with natural adhesives.
Native American healers used similar principles, employing pine pitch and other natural substances to hold wounds closed. They understood that proper wound closure wasn’t just about stopping bleeding – it was about creating the optimal environment for healing while preventing infection.
World War I and II saw further refinement of these techniques as medics in remote locations learned to improvise with available supplies. The famous “butterfly bandage” design was actually inspired by these field-expedient methods, later refined and mass-produced for modern medical use.
These historical precedents remind us that effective medical care doesn’t always require high-tech solutions. Sometimes, the most valuable knowledge comes from understanding fundamental principles and having the skill to apply them creatively.
Advanced Considerations and Troubleshooting
When NOT to Use Butterfly Closures
Certain wounds require professional medical attention and should never be treated with improvised closures:
- Deep wounds exposing fat, muscle, or bone
- Wounds with jagged or irregular edges
- Puncture wounds
- Wounds showing signs of infection
- Cuts on joints or areas of high movement
- Animal or human bites
Enhancing Effectiveness
Temperature considerations: Cold skin doesn’t hold adhesive well. Warm the skin slightly (body temperature) before applying closures for better adhesion.
Moisture management: Dry skin thoroughly before application. Even small amounts of moisture can cause premature failure.
Stress distribution: For wounds in areas of skin tension, consider placing additional tape strips parallel to the wound to reduce stress on the butterfly closures.
Common Mistakes to Avoid
- Over-tightening: Pulling the wound edges too tightly can cut off blood circulation and delay healing
- Inadequate cleaning: Dirt, debris, or blood under the closure can lead to infection
- Wrong tape choice: Avoid tapes with very aggressive adhesives that can damage skin when removed
- Premature removal: Leave closures in place for 7-10 days unless signs of infection develop
Modern Applications and Preparedness Integration
Understanding butterfly closure techniques fits perfectly into a comprehensive preparedness strategy. Natural disasters, grid failures, or extended periods of social unrest can all create situations where professional medical care becomes unavailable or delayed.
This knowledge pairs exceptionally well with other traditional healing methods. Learning to identify and use natural remedies from your medicinal garden creates a complete system of self-reliant healthcare.
Consider practicing this technique before you need it. Use expired butterfly closures or practice on family members with minor scratches (under supervision). Muscle memory developed during calm moments proves invaluable during high-stress emergencies.
Building Your Emergency Medical Knowledge Base
Butterfly closures represent just one technique in a comprehensive approach to emergency medicine. The principles you learn here – improvisation, resourcefulness, and understanding basic medical science – apply to countless other situations.
For those serious about developing comprehensive emergency medical skills, resources like The Home Doctor: Practical Medicine for Every Household provide detailed guidance on dozens of similar techniques. This comprehensive guide, developed by medical professionals who worked in Venezuela’s collapsed healthcare system, offers real-world tested methods for managing medical emergencies when professional help isn’t available.
The book covers everything from wound management and infection control to emergency surgical procedures and medication alternatives – all designed for implementation by ordinary people in extraordinary circumstances.
Storage and Shelf Life Considerations
Properly prepared butterfly closure materials can remain effective for years when stored correctly:
Tape storage: Keep medical tape in cool, dry conditions. Most quality medical tapes remain effective for 3-5 years when properly stored.
Benzoin tincture: This traditional adhesive enhancer has an indefinite shelf life when kept in a dark, cool place.
Honey: Raw honey never spoils and maintains its antiseptic properties indefinitely.
Rotate your supplies regularly and replace any materials showing signs of deterioration. Include these items in your regular emergency supply audits alongside essential first aid kit components.
Conclusion: Knowledge as Your Most Valuable Preparedness Asset
Learning to create and apply butterfly closures isn’t just about wound care – it’s about developing the confidence and capability to handle emergencies with available resources. This knowledge joins a toolkit of practical skills that distinguished previous generations and will prove invaluable as we navigate an increasingly uncertain future.
The technique itself is straightforward, but mastering it requires practice and understanding. Take time to gather the necessary materials, practice the technique, and integrate this knowledge into your broader preparedness strategy.
Remember that these skills work best when combined with comprehensive emergency medical knowledge. Resources like The Home Doctor provide the depth and breadth of information needed to handle a wide range of medical situations when professional help isn’t available.
Start building these capabilities today. Practice with family members, refine your technique, and ensure you have quality materials readily available. When the moment comes that this knowledge is needed, you’ll be grateful for the time invested in learning these time-tested, life-saving techniques.
Your ancestors survived and thrived using knowledge like this. In our modern world of fragile systems and increasing uncertainty, these skills are becoming relevant once again. Don’t wait until you need them to start learning.